
AbydOS开发日记 (7) - 内部中断
# RV64 的中断
搞了这么多基础设施,终于到中断的实现了。首先看下 RV 的中断和异常,
| Interrupt | Exception Code | Description |
|---|---|---|
| 1 | 0 | Reserved |
| 1 | 1 | Supervisor software interrupt |
| 1 | 2 | Reserved |
| 1 | 3 | Machine software interrupt |
| 1 | 4 | Reserved |
| 1 | 5 | Supervisor timer interrupt |
| 1 | 6 | Reserved |
| 1 | 7 | Machine timer interrupt |
| 1 | 8 | Reserved |
| 1 | 9 | Supervisor external interrupt |
| 1 | 10 | Reserved |
| 1 | 11 | Machine external interrupt |
| 1 | 12–15 | Reserved |
| 1 | ≥16 | Designated for platform use |
| 0 | 0 | Instruction address misaligned |
| 0 | 1 | Instruction access fault |
| 0 | 2 | Illegal instruction |
| 0 | 3 | Breakpoint |
| 0 | 4 | Load address misaligned |
| 0 | 5 | Load access fault |
| 0 | 6 | Store/AMO address misaligned |
| 0 | 7 | Store/AMO access fault |
| 0 | 8 | Environment call from U-mode |
| 0 | 9 | Environment call from S-mode |
| 0 | 10 | Reserved |
| 0 | 11 | Environment call from M-mode |
| 0 | 12 | Instruction page fault |
| 0 | 13 | Load page fault |
| 0 | 14 | Reserved |
| 0 | 15 | Store/AMO page fault |
| 0 | 16–23 | Reserved |
| 0 | 24–31 | Designated for custom use |
| 0 | 32–47 | Reserved |
| 0 | 48–63 | Designated for custom use |
| 0 | ≥64 | Reserved |
这里的 Interrupt 是 scause 这个 CSR 之中的最高位。
- 注:中断也叫异步异常,异常通常指同步异常,两者合并可以叫陷阱(Trap)。
# 控制
涉及到中断控制,一共有几个 CSR 需要考虑,如下:
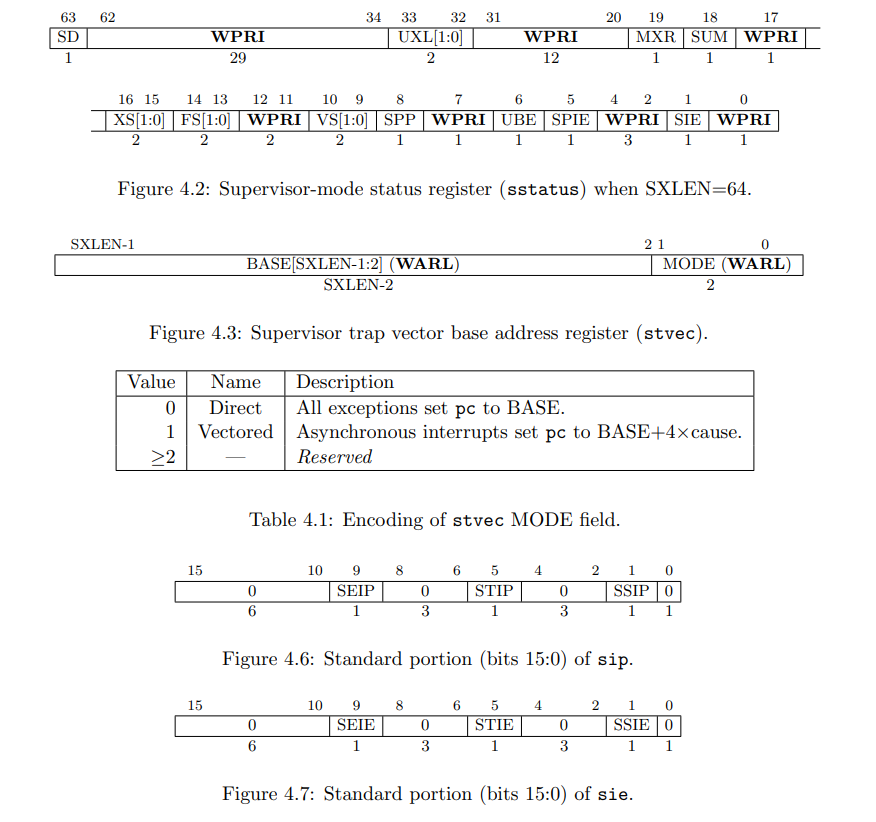
首先是 sstatus 这个 CSR,主要控制 S-mode 下的状态。与中断相关的有三位, SPP、SPIE、SIE。
SIE, 即 Supervisor Interrupt Enable, 就是 S-mode 下的核心全局中断使能。与之相关的有 SPIE,进入中断的时候,
SPIE <- SIE,SIE <- 0,而使用 SRET 指令退出中断时,SIE <- SPIE, SPIE <- 1。SPP 存储进入中断之前的特权模式,为 0 则表示之前是 U-mode,否则表示之前是 S-mode。执行 SRET 指令时,根据 SPP 的值设定相应的特权模式。
然后是 stvec ,存储 S-mode 下的中断基地址以及模式。如图所示,低两位是模式位,可以选择向量化的中断或者直接捕获到一个入口。不难注意到留给基址的空间少了低两位,这是特意的,即要求基址(至少) 4 字节对齐。
留意
异常始终被捕获到基址,但是 0 号中断按理来说是用户模式软件中断,同样会捕获到 base + 0x0 ,不是会冲突吗?这里给出 [RISCV特权级手册] 原文:
When vectored interrupts are enabled, interrupt cause 0, which corresponds to user-mode software interrupts, are vectored to the same location as synchronous exceptions. This ambiguity does not arise in practice, since user-mode software interrupts are either disabled or delegated to user mode.
接着是 sip 和 sie 这两个 CSR,分别是 中断等待 和 中断使能。sip 中置位表示对应中断触发,在等待中;sie 置位表示允许对应中断。留意标出来的三个位,SEIE, STIE 和 SSIE。这分别表示 外部(External)、时钟(Timer)、软件(Software)中断。对应的有 SEIP, STIP 和 SSIP,但是只有 SSIP 可以被软件直接清除。剩下的两个,SEIP 由中断控制器控制,而 STIP 由时钟比较器控制。
# 状态

如图所示,三个 CSR 保存了状态,分别是:
sepc: 进入中断之前的 PC 值,SRET 后会被写入 PC。scause: 引起中断的原因,和上文第一张图对应stval: 中断的值,比较复杂,可以参见手册sscratch: 用于提供临时量,非常重要
# 中断源
RV 的中断源由 CLINT 和 PLIC 提供。其中,CLINT 即 Core Local INT,每个核心都有一个,提供时钟和软件中断(IPI ,Inter-Processor Interrupt,其终端就是软件中断)。而 PLIC 即 Platform Level Interrupt Controller,统一管理外部中断并路由到多个核心。
本文仅涉及 CLINT,主要通过 CSR 控制。
# 现场保存与恢复
要正常执行正常程序和中断服务程序(ISR),必不可少的就是现场保存与恢复。根据 RV 的 ABI,调用约定如下:
| Name | ABI Mnemonic | Meaning | Preservedacross calls? |
|---|---|---|---|
| x0 | zero | Zero | — (Immutable) |
| x1 | ra | Return address | No |
| x2 | sp | Stack pointer | Yes |
| x3 | gp | Global pointer | — (Unallocatable) |
| x4 | tp | Thread pointer | — (Unallocatable) |
| x5 - x7 | t0 - t2 | Temporary registers | No |
| x8 - x9 | s0 - s1 | Callee-saved registers | Yes |
| x10 - x17 | a0 - a7 | Argument registers | No |
| x18 - x27 | s2 - s11 | Callee-saved registers | Yes |
| x28 - x31 | t3 - t6 | Temporary registers | No |
我们要保存的是,除了 Callee-saved 以及 zero 和 sp 以外的全部寄存器,共 17 个。
特别的,sp 在进入中断时,我们就将其与 sscratch 交换,这样就可以获得栈空间了;而 tp 和 gp 一般不在 OS 里面使用,但是我们的设计利用了 TLS 和 tp 寻址核心本地存储,而 gp 则是 Linker Relaxation 使用的,可以有效简化频繁使用数据的寻址过程。
- 关于 Linker Relaxation,请参阅 RISC-V ABI (opens new window)。
- 关于浮点寄存器和向量寄存器,在内核中并不常用,我们直接重新编译工具链将其在内核中完全禁用(-mabi=lp64, -march=rv64imac_zicsr),即可不保存之
# 现场保存之前:寻找合适的空间
现场的保存需要一些空间,ISR 的执行也需要一定的栈。在上一篇中,我们为之在每个核心栈的底端留出了一点空间,固然可行,但是这并不是一个好主意。其一,这样做会导致预留空间在正常内核程序中无法利用,浪费内存;其二,ISR 的栈空间被限制在这一空间之内,不灵活。第二点可以通过二次切栈解决,即将系统 sp 保存在预留空间的某处,然后保存完现场再切一次栈,其缺点就是需要再次访存,拖慢速度。
所以,我们直接废弃这一方案,中断时直接使用系统栈保存现场和恢复。但是这样引发两个问题:
- 中断时只有一个寄存器可用,而在系统模式下中断,sscratch 的值不是当前栈顶,如何判别模式?
tp值如何从sp计算?
必须解决这两个问题才能正确保存现场。
先考虑第一个问题,第一反应应该是之前提到的 SPP 位,可是并不可行。怎么回事呢?我们必须考虑到只有一个寄存器可用这一事实,而这个寄存器恰好保存了系统栈指针(无论在哪里),因此在确定正确的栈之前,我们无法将 CSR 的值加载到这一寄存器中并进行检验,否则我们就丢失 sp 了。
第二种方法是依靠系统空间和用户空间的分割。在前面地址空间布局中,我们将高地址留给用户,而低地址作为系统。这样的空间安排,显然可以预料,正常情况下,如果在用户模式触发中断,sepc 的值应该小于 0,而系统模式则 > 0。sp 也和 sepc 情况类似。很好,这是正常情况,但是如果是不正常的情况呢?考虑一个恶意的用户程序,它将 sp 或者 sepc 设置为系统空间的值,随便访问一下内存就可以触发异常,随后陷入内核;如果我们以之为判据,那么就可能错误地将 sp 设为恶意程序指定的值,进而发生任意内核内存修改。这是一个重大的安全问题,违背了 永远不要相信用户的输入 原则,因此也不能采用这种方案。
最终的解决方案实际上很简单,充分体现了“大道至简”。我们首先考虑这一前提,在我们切换到用户模式运行之前,一定会将当前系统 sp 保存到 sscratch,进而,从用户模式陷入时,sscratch的内容就是正确的 sp。而在系统模式发生陷入,由于不能追踪 sp 到 sscratch,而 sp 实际上就是正确的,所以我们只需规定,在系统模式执行时 sscratch 一定为一个特殊值,取 0 就好。
所以,陷入之后首先将 sscratch 与 sp 交换,然后判断 sp 是否为 0,如果是 0 就再次交换,否则进行下一步。定义一个宏,使用内嵌汇编,如下:
#define K_ISR_SWITCH_SP() \
    asm volatile( \
        "csrrw sp, sscratch, sp \n" \
        /* We'd judge that: if sscratch == 0, then from S-mode; otherwise from U-mode */ \
        "bnez sp, 1f \n" \
        "csrrw sp, sscratch, sp \n"  \
        "1: \n" \
    )
2
3
4
5
6
7
8
# 现场保存:从 sp 恢复 tp
确定了 sp,我们就可以将要保存的寄存器全部换出来了。但是,tp 还没有确定,不过可以肯定,和 sp 相关。我们只需规定,核心栈的总大小一定对齐到 2 的 n 次,就可以通过简单的运算将其恢复,具体说,就是
- 将 sp 加载到 tp
- 确定 核心栈 是否被使用过,如果使用过,加一个单位的 STACK_SIZE 到 tp 恢复
- 将 tp 的低位清零,得到核心栈底
- 将 tp 减去 TLS 的大小,即得正确的 tp
具体代码实现如下所示,使用两个移位和addi代替一个 li,同时将低位清零:
#define K_ISR_SAVE_CONTEXT() \
    asm volatile( \
        "add sp, sp, -" _VSTR(SAVE_SPACE * REG_SIZE) " \n" \
        REG_S " ra, " _VSTR(0 * REG_SIZE) "(sp) \n" \
        REG_S " gp, " _VSTR(1 * REG_SIZE) "(sp) \n" \
        REG_S " tp, " _VSTR(2 * REG_SIZE) "(sp) \n" \
        REG_S " t0, " _VSTR(3 * REG_SIZE) "(sp) \n" \
        REG_S " t1, " _VSTR(4 * REG_SIZE) "(sp) \n" \
        REG_S " t2, " _VSTR(5 * REG_SIZE) "(sp) \n" \
        REG_S " t3, " _VSTR(6 * REG_SIZE) "(sp) \n" \
        REG_S " t4, " _VSTR(7 * REG_SIZE) "(sp) \n" \
        REG_S " t5, " _VSTR(8 * REG_SIZE) "(sp) \n" \
        REG_S " t6, " _VSTR(9 * REG_SIZE) "(sp) \n" \
        REG_S " a0, " _VSTR(10 * REG_SIZE) "(sp) \n" \
        REG_S " a1, " _VSTR(11 * REG_SIZE) "(sp) \n" \
        REG_S " a2, " _VSTR(12 * REG_SIZE) "(sp) \n" \
        REG_S " a3, " _VSTR(13 * REG_SIZE) "(sp) \n" \
        REG_S " a4, " _VSTR(14 * REG_SIZE) "(sp) \n" \
        REG_S " a5, " _VSTR(15 * REG_SIZE) "(sp) \n" \
        REG_S " a6, " _VSTR(16 * REG_SIZE) "(sp) \n" \
        REG_S " a7, " _VSTR(17 * REG_SIZE) "(sp) \n" \
        "mv tp, sp \n" \
        "li gp, " _VSTR(K_CONFIG_KERNEL_STACK_SIZE - 1) "\n" \
        "and gp, gp, sp \n" \
        "srai tp, tp, " _VSTR(K_CONFIG_STACK_SIZE_N) "\n" \
        "beqz gp, 1f \n" /* No stack space used, do not add 1 to recover */ \
        "addi tp, tp, 1 \n" \
        "1:" \
        "slli tp, tp, " _VSTR(K_CONFIG_STACK_SIZE_N) "\n" \
        "lla gp, _tls_len \n" \
        "sub tp, tp, gp \n" \
        ".option push \n" \
        ".option norelax \n" \
        "lla gp, __global_pointer$ \n" \
        ".option pop \n" \
    )
2
3
4
5
6
7
8
9
10
11
12
13
14
15
16
17
18
19
20
21
22
23
24
25
26
27
28
29
30
31
32
33
34
35
36
- 注:
RES_S根据位数选择sw/sd,_VSTR(x)取宏x的值并转为字符串。
# 现场恢复
现场恢复就很简单,直接把存的值再加载到寄存器即可。
#define K_ISR_RESTORE_CONTEXT(ret) \
    asm volatile( \
        REG_L " ra, " _VSTR(0 * REG_SIZE) "(sp) \n" \
        REG_L " gp, " _VSTR(1 * REG_SIZE) "(sp) \n" \
        REG_L " tp, " _VSTR(2 * REG_SIZE) "(sp) \n" \
        REG_L " t0, " _VSTR(3 * REG_SIZE) "(sp) \n" \
        REG_L " t1, " _VSTR(4 * REG_SIZE) "(sp) \n" \
        REG_L " t2, " _VSTR(5 * REG_SIZE) "(sp) \n" \
        REG_L " t3, " _VSTR(6 * REG_SIZE) "(sp) \n" \
        REG_L " t4, " _VSTR(7 * REG_SIZE) "(sp) \n" \
        REG_L " t5, " _VSTR(8 * REG_SIZE) "(sp) \n" \
        REG_L " t6, " _VSTR(9 * REG_SIZE) "(sp) \n" \
        REG_L " a0, " _VSTR(10 * REG_SIZE) "(sp) \n" \
        REG_L " a1, " _VSTR(11 * REG_SIZE) "(sp) \n" \
        REG_L " a2, " _VSTR(12 * REG_SIZE) "(sp) \n" \
        REG_L " a3, " _VSTR(13 * REG_SIZE) "(sp) \n" \
        REG_L " a4, " _VSTR(14 * REG_SIZE) "(sp) \n" \
        REG_L " a5, " _VSTR(15 * REG_SIZE) "(sp) \n" \
        REG_L " a6, " _VSTR(16 * REG_SIZE) "(sp) \n" \
        REG_L " a7, " _VSTR(17 * REG_SIZE) "(sp) \n" \
        "add sp, sp, " _VSTR(SAVE_SPACE * REG_SIZE) "\n"  \
    )
2
3
4
5
6
7
8
9
10
11
12
13
14
15
16
17
18
19
20
21
22
# 中断入口函数与中断向量表
考虑不用在正经的汇编代码文件里面写入口函数,直接利用编译器生成。不过,入口函数和普通函数还是有区别,就是编译器会对普通函数生成入口和出口代码,而我们不希望入口函数如此,所以利用一下 GCC 的裸函数 (Naked Function) 属性。在裸函数中,编译器不生成入口与出口代码,代价是里面只能用内嵌汇编。首先定义:
#ifdef __cplusplus
#define K_ISR extern "C"
#else
#define K_ISR
#endif
#define K_ISR_ENTRY K_ISR __attribute__((naked))
2
3
4
5
6
随后定义一个入口函数生成宏:
#define K_ISR_ENTRY_IMPL(name, func)                                                                                   \
    K_ISR_ENTRY void name()                                                                                            \
    {                                                                                                                  \
        K_ISR_SWITCH_SP();                                                                                             \
        K_ISR_SAVE_CONTEXT();                                                                                          \
        asm volatile("call " #func "\n");                                                                              \
        K_ISR_RESTORE_CONTEXT();                                                                                       \
        K_ISR_SWITCH_SP();                                                                                             \
        asm volatile("sret");                                                                                          \
    }
2
3
4
5
6
7
8
9
10
在这个入口函数中,我们首先确定了 sp,然后保存现场,接着调用指定的 ISR,随后恢复现场,最后处理 sp,再次使用 K_ISR_SWITCH_SP() 即可。这样我们就可以利用这个宏生成中断入口函数了,例如:
K_ISR_ENTRY_IMPL(k_softirq_entry, isr_softirq)
K_ISR_ENTRY_IMPL(k_timer_entry, isr_timer)
K_ISR_ENTRY_IMPL(k_extirq_entry, isr_extirq)
2
3
中断向量表实际上很简单,就是一连串的跳转指令。不过要注意的是,跳转地址比较近的话,可能会被编译成压缩的跳转指令,其长度只有 2 byte,为了保持对齐,我们可以手动加入 .align 。如下所示:
	.section .entry, "ax", %progbits
	.align 3
	.globl _exctable
_exctable:
	// 0x0 General exception
	j _start_hang
	.align 2
	// 0x1 Suprvior software interrupt
	j k_softirq_entry
	.align 2
	// 2 - 4 Reserved
	j _start_hang
	.align 2
	j _start_hang
	.align 2
	j _start_hang
	.align 2
	// 0x5 Supervisor timer interrupt
	j k_timer_entry
	.align 2
	// 0x6 Supervisor external interrupt
	j k_extirq_entry
	.align 2
	// 0x7 - 0x1F Reserved
	j _start_hang
	.align 2
    // ...
	// End of exception table
2
3
4
5
6
7
8
9
10
11
12
13
14
15
16
17
18
19
20
21
22
23
24
25
26
27
28
# 第一个中断:Timer
Timer 的设置在标准中并不是由 S-mode 执行的,而是 M-mode,但是诸如 C906 之类的平台可以扩展,允许在 S-mode 访问并设置。这里我么直接使用 SBI 提供的 Timer 扩展启用 Timer 即可。不过,还需要打开核心中断和时钟中断,才能正常触发。如下:
// to be run by each hart
int k_premain(int hartid)
{

    _REENT_INIT_PTR(&hl_reent);
    ::hartid = hartid;

    // Setup Hart Timer
    auto rc = SBIF::Timer::setTimer(hartid * 10000000);
    if (rc)
    {
        printf("Failed to set timer: %ld\n", rc);
        k_hart_state[hartid] = 3; // mark as failed
        SBIF::HSM::stopHart();
        while (1)
            wfi();
    }
    extern char _exctable;
    set_stvec((unsigned long)&_exctable, 1);
    csr_set(CSR_SIE, SIP_STIP | SIP_SSIP);

    k_hart_state[hartid] = 2;
    while (k_stage != K_MULTICORE)
        ;          // wait for the boot core to finish
    csr_set(CSR_SSTATUS, SSTATUS_SIE);
    return hartid; // keep hart id in a0
}
2
3
4
5
6
7
8
9
10
11
12
13
14
15
16
17
18
19
20
21
22
23
24
25
26
27
这里我们等待内核进入多核模式之后再打开核心中断,防止过早陷入产生问题。
而中断处理函数,随手写一个测试一下:
K_ISR void isr_timer()
{
    auto time = csr_read(CSR_TIME);
    printf("Timer interrupt for hart %i\n",hartid);
    printf("Current Time: %ld\n", time);
    auto rc = SBIF::Timer::setTimer(time + 10000000);
    if(rc)
        printf("Cannot reset timer: %ld\n", rc);
}
2
3
4
5
6
7
8
9
并在k_main()中加一个死循环,编译运行即可。
示例输出
> Switching to multicore mode
Hello from hart 3!
Hello from hart 2!
Hello from hart 1!
Timer interrupt for hart 0
Current Time: 1794388
Hello from hart 0!
Timer interrupt for hart 1
Current Time: 10002850
Timer interrupt for hart 0
Current Time: 11798104
Timer interrupt for hart 2
Timer interrupt for hart 1
Current Time: 20006223
Current Time: 20006119
Timer interrupt for hart 0
Current Time: 21800716
Timer interrupt for hart 2
Current Time: 30733692
Timer interrupt for hart 1
Current Time: 31283762
Timer interrupt for hart 3
Current Time: 31578534
Timer interrupt for hart 0
2
3
4
5
6
7
8
9
10
11
12
13
14
15
16
17
18
19
20
21
22
23
24
注意
RV 的 Timer 不会自动重载,所以需要手动重装。并且,由于 Timer 实际的位数限制,可能重装值最大长度并不是 64 位,比如 QEMU 的 Virt 平台写入 (u64)-1 就没有效果(无限触发中断),写入 ((u64)-1) >> 4 才有效果。
# 软件中断:以 IPI 为例
前面提到,IPI 的终点是触发软件中断。我们可以使用 SBI 发送 IPI,来触发其他核心执行代码,典型应用就是通知系统关机。先写一个 ISR:
K_ISR void isr_softirq()
{
    printf("Software interrupt for hart %i\n",hartid);
    extern thread_local bool k_halt;
    k_halt = true;
    csr_clear(CSR_SIP, SIP_SSIP); // 手动清标志,不然又无限触发
}
2
3
4
5
6
7
然后修改时钟中断 ISR,提供一个 10 秒后发送 IPI 的功能:
K_ISR void isr_timer()
{
    auto time = csr_read(CSR_TIME);
    printf("Timer interrupt for hart %i\n",hartid);
    printf("Current Time: %ld\n", time);
    if(time > 10 * 10000000){
        SBIF::IPI::sendIPI(-1, 0);
        SBIF::Timer::clearTimer();
        return;
    }
    auto rc = SBIF::Timer::setTimer(time + 10000000);
    if(rc)
        printf("Cannot reset timer: %ld\n", rc);
}
2
3
4
5
6
7
8
9
10
11
12
13
14
然后在 k_main() 中增加一个对 k_halt 标志的判断,以退出循环。这样,编译运行应该得到这样的输出:
Timer interrupt for hart 0
Current Time: 92152545
Timer interrupt for hart 3
Current Time: 92946982
Timer interrupt for hart 1
Current Time: 102619477
Timer interrupt for hart 2
Current Time: 102708244
Software interrupt for hart 2
Software interrupt for hart 1
Hart 2 has returned with 0
Hart 1 has returned with 0
Timer interrupt for hart 0
Current Time: 102710346
Software interrupt for hart 3
Software interrupt for hart 0
Hart 0 has returned with 0
Timer interrupt for hart 3
Current Time: 107133001
Software interrupt for hart 3

> Waiting for other harts to return...

Reached k_after_main, clearing up...
* Kernel heap usage: 569344
===== Test Kernel exited with 0 =====
2
3
4
5
6
7
8
9
10
11
12
13
14
15
16
17
18
19
20
21
22
23
24
25
26
至此,内部中断相关问题解决!